
The Cyclone RX3 Headlight
The headlight on the RX3 uses a single 35/35W H1S bulb. Also in the headlight assembly are two strips of LED running lights and a small T10 bulb running light. The reason for the running lights is the RX3 is sold in countries where it's not required to have the headlight on anytime the bike is running. Without the headlight on it would be a good idea to at least have running lights!
That's also the reason for the two position switch next to the throttle grip. It originally turned on either the headlight low beam or high beam. On the Cyclone RX3 it turns on power to one (but not both) of two accessory connectors accessible under the rear seat. Those connectors appear to be standard 2.8mm molex type connectors.
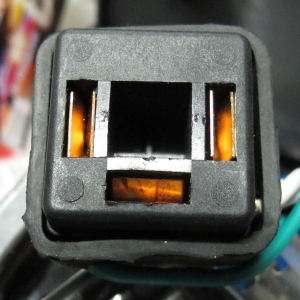 The headlight assembly itself is completely made of plastic. The frame and housing are plastic, the lens is plastic, the bulb holder is plastic and the power connector is plastic. Incidentally, the H1S connector isn't the best quality one I've ever seen. First it's plastic and second the contacts are just thin sheets of folded copper. However, it appears to work and it's hard to find a replacement that might fit in the housing. It's about 0.7" deep and there's no room for anything deeper. I have some nice ceramic sockets, but at 1" deep they just won't fit. There's nothing wrong with plastic unless you get it hot, at which point it melts! So that brings us to the question of whether it's safe to put a higher wattage bulb in the RX3 headlight. The answer is maybe.
Though the bulb holder is designed for an H1S bulb, a standard H4 bulb will also fit (it may require bending of a couple of tabs on the bulb). Most auto H4 headlights are 55/60W though regulations allow up to 75/68w @ 13.2v. I've seen even higher wattage bulbs advertised too. The higher the wattage, the more heat the bulb generates and the question is will the increased heat from a brighter bulb eventually melt the headlight assembly of the RX3?
That's a tough question to answer because you could be riding through Death Valley in 110 degree heat or you could be riding in Alaska in winter at -40 degrees. The plastic temperature in the headlight assembly will be quite different in those two cases.
If you want a brighter bulb and are prepared to compromise, there's an H4 45/45W bulb available. I suspect that it will be fine for most people (who don't ride through death valley). I'm using one myself and so far no problems, though the temperature here hasn't gotten above 70 degrees yet.
What about HID (high intensity discharge) and LED bulbs. Well, for a start, both are illegal. If you have a headlight assembly designed for a two filament tungsten halogen bulb, the only legal bulbs you can use are two filament tungsten-halogen bulbs. Other bulbs won't give the same beam pattern and won't pass DOT regulations. Off road it doesn't matter, on road it does.
LEDs would be the ideal solution if they were legal and if they fit. The problem is LEDs do not like to get hot. If they get hot they will rapidly fail. They also generate quite a lot of heat and so need to be secured to an efficient heat sink. This heat sink has to be attached to the base of the bulb and is sometimes fan cooled. All if this adds length to the bulb base and there is no room in the RX3 headlight assembly for any extra length. You can get LED bulbs that have the same base as regular H4 bulbs, but they don't put out much light and they don't have a high/low beam capability which changes the beam shape. So LEDs aren't a viable option in the headlight, even for off road use. HIDs have similar space issues and also aren't legal for on-road use.
The bottom line is that if you need more light for riding at night, auxilliary LED lights may be the best solution
Changing the headlight bulb
This takes maybe 10 minutes and is pretty simple:
- Remove the windscreen (this may not be absolutely necessary, but it makes life a lot easier)
- Remove the two allen head bolts, one on either side of the headlight assembly and pull the headlight away from the frame.
- Disconnect the headlight connector
- You can now lift the headlight away from the bike.
- Remove the 9 phillips head screws from the rear of the headlight assembly
- Lift the back off the assembly giving you access to the bulb.
- Remove the H1S connector from the base of the bulb
- Remove the rubber boot
- Rotate the white plastic retainer clip around the base and remove it.
- Pull the bulb out of the reflector (it may be a tight fit, so wiggle it a little).
Now it's time to put in the new bulb. If it's a direct H1S base bulb it should fit with no problems. If it's an H4 bulb you may need to bend down two small tabs which stick up from the base. These fit in slots in the bulb housing and are different for H1S and H4 bulbs.
- Put the new bulb in the reflector assembly. Make sure it's fully seated.
- Replace the white locking collar over the bulb base and twist it to lock the bulb in place
- Replace the rubber boot
- Replace the headlight connector
- At this point it's not a bad idea to briefly reconnect the headlight connector, turn the bike on and make sure both the high and low beams work.
- If all is OK, reassemble the headlight and put the 9 phillips head screws back in
- Reconnect the headlight connector
- Put the headlight assembly back on the bike and reinstall the two allen head screws on the sides.
- At this point you need to adjust the up/down angle of the headlight so that the low beam doesn't shine in the eyes of oncoming drivers. The standard recommendation is to position the bike about 25-30ft from a wall and draw a horizontal line on the wall at the same height as the headlight (when you're sat on the bike). On low beam, the top of the beam should be no more than 90% of the headlight height. So if the center of the headlight is 36" from the ground, the top of the low beam with you sitting on the bike should be 32" or less from the ground
- Tighten the two mounting screws
- Replace the windscreen